
Prototypes, canvas, and works
This page covers the works a Bot creates, such as product prototypes and slide decks: how to start a creation, how to view, annotate, and edit on the multi-screen canvas, how to manage versions and design systems, how to export and share, and how to browse everything in the works library.
Works are hosted on the server and saved by version. The Bot edits them in its own workspace and hands back a new version when done; group members view, annotate, and edit them directly on the web, or hand them to the AI to change.
Start a creation
Creating relies on creation plugins, such as the built-in 「产品原型」 (Product prototype; multi-screen clickable prototypes for mini programs and apps) and 「幻灯片」 (Slides; single-file HTML slide decks you can page through). A sysadmin first has to turn on 「插件」 (Plugins) in system parameters, and a group admin enables plugins for the group in 「群设置 → 插件」 (Group settings → Plugins); see Skill market and plugins.
Once a creation plugin is enabled in the group, there are three ways to start:
- Click the 「创作」 (Create) button in the composer, or pick a plugin from the 「插件」 (Plugins) group of the
/suggestions, to open the creation panel; - @ a Bot in the group and describe what you want. The Bot posts a 「创作确认」 (Creation proposal) card listing the parameters it understood, and group members click 「开始」 (Start), 「改参数…」 (Edit…), or 「不用了」 (Dismiss);
- Slash commands provided by the plugin.
Creation panel
Taking 「产品原型」 (Product prototype) as an example, the top of the panel asks 「想做个什么样的产品?」 (What shall we design?). Just write your requirements, or click one of the examples below. Other options:
- Design system: defaults to 「自动选择」 (Auto), letting the AI choose based on your requirements. You can also pick one of the plugin's presets, or 「导入我的设计…」 (Import my design…): paste or upload a DESIGN.md, or point to a reference website or repository (the Bot extracts colors, fonts, and component style from it each time it creates). Imported designs are saved in the group and available to all later creations.
- More: 「添加附件…」 (Add attachments…) as reference material; 「先出 2–3 个视觉方向」 (Sketch 2–3 visual directions first): produce a few direction sketches first, pick one in the group, then make the full design (one extra round of generation).
- Assign to: choose a Bot in this group and click 「交给 @Bot」 (Hand to @Bot).
Other plugins' panels are split into steps — 「类型与模板」 (Type and template), 「设计系统」 (Design system), 「内容与参数」 (Content and options), 「交给谁」 (Assign to) — and the form is generated from the inputs the plugin declares. Only Bots that are online and can use the plugin can be chosen; the ones that can't say why (e.g. 「不支持」 (Unsupported), 「需升级」 (Upgrade needed), 「缺密钥」 (Missing secrets), 「待授权」 (Awaiting permission)).
Once sent, a 「创作请求 · 插件名」 (Create request · plugin name) card appears in the group and automatically @-mentions the chosen Bot. All group members can see the parameters and can ask for 「再来一版」 (Another version) or 「改参数重做…」 (Redo with changes…).
Work cards
Once the Bot starts, a work card appears in the group showing a thumbnail, the version, and the status:
| Status | Meaning |
|---|---|
| 生成中 (Generating) | The first version isn't done yet |
| 就绪 (Ready) | Ready to open |
| 有候选版本 (Candidate version) | There's a version that conflicted with other changes and couldn't be merged automatically; see below |
| N 项规范问题 (N design issues) | Problems found by automatic checks, such as colors not from the design system |
- 「打开」 (Open): opens the work in the workbench on the right.
- 「继续对话」 (Continue chatting): 「正在编辑 · 作品名」 (Editing · work name) appears above the composer, and subsequent messages all target this work; click × to stop.
When the group has works, the group's tab bar gains a 「作品 N」 (Works N) tab. It lists all works in the group, their versions, and the Bot's progress; you can search, 「继续对话」 (Continue chatting), or 「打开」 (Open).
Canvas
A work opens in the workbench as an 「产物」 (Artifact) tab. Each screen of a prototype is a screen on the canvas that you can drag around freely.
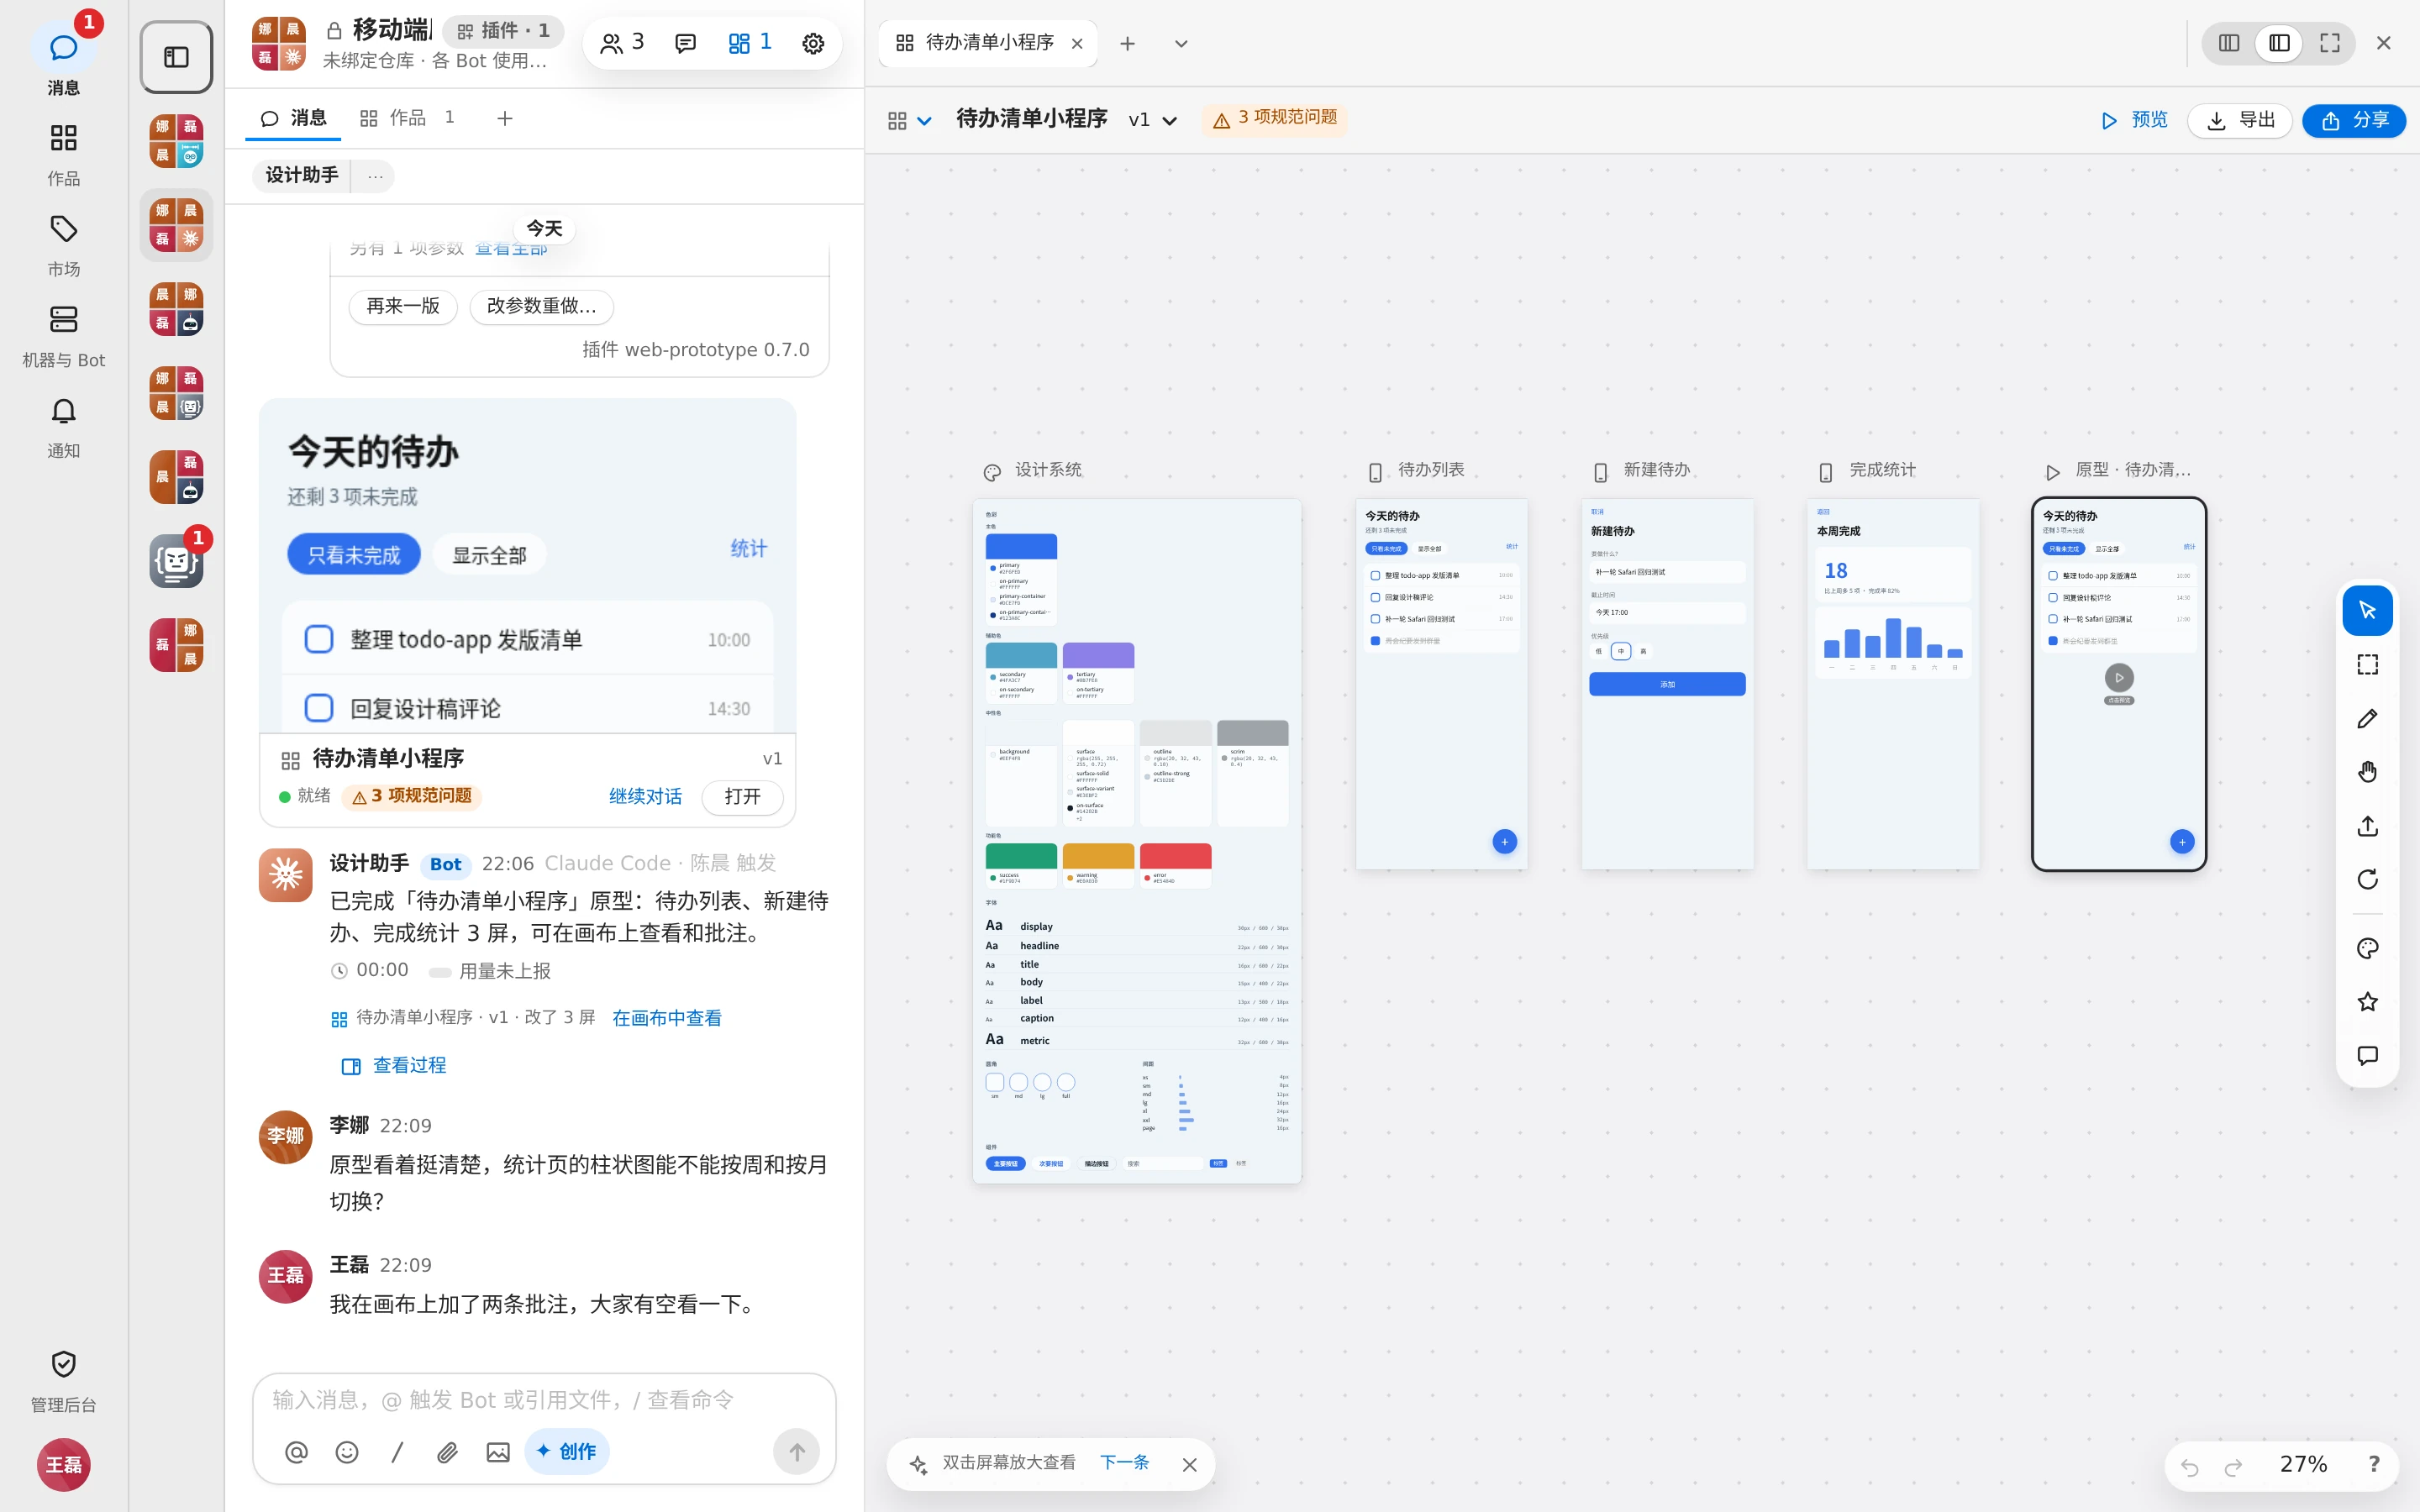
Left toolbar:
| Tool | Shortcut | What it does |
|---|---|---|
| 选择 (Select) | V | Select screens; ⇧-drag to box-select several |
| 标记 (Mark) | M | Click an element on a screen or drag a box around an area to write an annotation |
| 直接编辑 (Direct edit) | E | Click text to edit it, click an element to change its style |
| 抓手 (Hand) | H | Drag the canvas |
| 上传到画布 (Upload to canvas) | Add reference files (images, PDFs, text files, up to 5 MB each); you can also drag files straight onto the canvas |
- Double-click a screen to zoom in; F focuses the selection, ⇧F adds it to favorites. Links between screens are hidden by default; press X to show them.
- ⌘K opens the command menu, where you can search all commands, screens, and tools; press ? to see all shortcuts.
- The 「产物菜单」 (Artifact menu) at the top offers 「重命名」 (Rename), 「创建副本」 (Duplicate), 「下载 .zip」 (Download .zip), and 「删除产物」 (Delete artifact). After deletion, group members no longer see it; its files and versions are kept.
With a screen selected
Selecting a screen brings up a floating toolbar:
| Menu | Contents |
|---|---|
| 生成 (Generate) | 「变体」 (Variations; by layout, color scheme, image, typography, text content, or 「自定义…」 (Custom…)), 「重新生成」 (Regenerate), 「动效」 (Animate), plus canvas commands provided by the plugin |
| 修改 (Modify) | 「编辑」 (Edit), 「设计系统」 (Design system) |
| 预览 (Preview) | 「新标签页打开」 (Open in new tab), 「显示二维码」 (Show QR code), display at mobile / tablet / desktop size, 「全高」 (Full height) |
| 更多 (More) | 「查看详情」 (View details; dimensions, design system, source, source version, design notes), 「查看代码」 (View code), 「导出」 (Export), 「下载」 (Download), 「重新加载」 (Reload), 「删除」 (Delete) |
Right-click for more, such as 「复制为 PNG」 (Copy as PNG) and 「复制选区链接」 (Copy link to selection).
With screens selected, just describe the change in the group composer on the left — no @ needed. Above the composer you'll see 「N 个屏幕」 (N screens) and 「发给 @Bot」 (Send to @Bot), and you can 「换 Bot」 (Switch bot). Turn on the 「变体」 (Variations) switch and choose a count, and your description generates variations of the selected screens. Say something like 「点 X 时打开下一屏」 ("tapping X opens the next screen") and the AI wires up the link. Selected reference files can also be 「添加到对话」 (Add to chat).
When the Bot is offline, requests are queued, showing 「@Bot 离线,N 个指令排队中,上线后自动执行」 ("@Bot is offline: N requests queued, they run once it is back").
Direct edit
Use 「直接编辑」 (Direct edit) to click an element on a screen:
- Text: type directly; Enter saves, Esc cancels.
- Images: 「替换图片」 (Replace image) — paste an https URL or upload.
- Style: in 「编辑元素」 (Edit element), adjust text color, background, font size, font weight, line height, padding, margin, width, height, corner radius, border color, and more.
- 「用 AI 修改」 (Edit with AI): describe how to change this element and send it to the Bot.
- 「链接」 (Link): set which screen it jumps to when clicked, or describe a new screen for the AI to create.
- Delete element: removes it from the source and creates a new version.
Elements generated by scripts can only be annotated, not edited directly. Direct edits are saved as a new version.
Annotations
Use the 「标记」 (Mark) tool to click an element or circle an area, then write your feedback. Open the 「批注」 (Annotations) panel to see all annotations:
- Each annotation is marked 「待处理」 (Needs you) or 「已解决」 (Resolved), and can be 「解决」 (Resolve) or 「重新打开」 (Reopen).
- Select annotations and click 「发给 @Bot(N)」 (Send to @Bot (N)) to hand them to the AI in one go.
- When the Bot hands back a new version, the panel says 「vN 上发给 AI 的 K 条批注,看看新版本改好了没有」 ("K notes sent to the AI on vN: check whether the new version took care of them"). After checking, click 「标为已解决」 (Mark resolved) or 「全部标为已解决」 (Resolve all).
Versions
Every AI change, direct edit, design system application, screen deletion, and so on creates a new version. Each version can be up to 200 MB.
- The 「版本」 (Version) menu at the top lists all versions and their source (AI generated, manual edit, local changes). Choose an old version to view it read-only, showing 「正在查看 vN(只读)」 (Viewing vN (read-only)); you can 「回到当前版本」 (Back to current version) or 「设为当前版本」 (Make current version).
- When the Bot hands back a new version, you see 「某某 更新到 vN,改动的屏已标出」 ("X updated it to vN; changed screens are marked"), and changed screens are labeled 「本版改动」 (Changed).
- You can keep editing while the AI is still working; its changes are merged automatically when it delivers. If the same file conflicts, the AI's version is kept as a 「候选」 (Candidate), and you decide whether to make it the current version.
Design system
The 「设计系统」 (Design system) panel manages colors, fonts, and component styles in one place, corresponding to DESIGN.md and tokens.css in the work:
- 「预设」 (Presets): apply a design system bundled with the plugin or imported into this group. This overwrites the current theme and creates a new version.
- 「主题」 (Theme): light / dark. Changing the 「种子色」 (Seed colour) re-derives the primary, background, surface, text, and border colors; colors you've changed by hand stay as they are.
- 「色板」 (Palette; primary, secondary, neutral, semantic), 「字体」 (Typography), font sizes and line heights, 「圆角与间距」 (Radius and spacing), and previews of components such as buttons.
- 「保存」 (Save) saves only the design system; 「保存并让 AI 统一」 (Save & apply with AI) saves it and then has the Bot bring every screen in line with the design system.
The DESIGN.md node on the canvas offers 「打开 DESIGN.md」 (Open DESIGN.md) and 「复制 Markdown」 (Copy Markdown).
Prototype preview
Click 「预览」 (Preview) at the top to enter the prototype preview and tap buttons to move between screens, just like on a real device:
- 「设备」 (Device) switches between mobile, tablet, and desktop; 「高亮热点」 (Highlight hotspots) marks the clickable spots; 「扫码查看」 (Scan QR code) opens it on your phone; 「重新开始」 (Start over) returns to the first screen; Esc or 「返回画布」 (Back to canvas) exits.
- Switch to 「编辑」 (Edit) to 「连到屏幕」 (Connect to screen) an element and choose a transition (none, push, push back, slide up, fade), or 「断开连接」 (Disconnect). You can also 「AI 改这屏」 (Change with AI), 「用 AI 新建屏」 (Create with AI), or 「复制当前屏」 (Duplicate this screen).
Export and share
The 「导出」 (Export) panel starts with a 「格式」 (Format):
| Format | Description |
|---|---|
| .zip | Download all files of this version plus the prototype shell; unzip and double-click index.html to present it |
| 复制代码 (Copy code) | Copy the HTML source of the selected screens (all screens if none are selected) to the clipboard |
| 项目简报 (Project brief) | Have the Bot write a product requirements document from the work, saved as brief.md |
| 实现提示词 (Implementation prompt) | Copy implementation instructions you can hand straight to a coding agent: the work's directory, notes for each screen, the navigation between screens, and key points of the design system |
| 分享链接 (Share link) | Turn on sharing and copy the link |
The 「分享」 (Share) dialog:
- Who can see it: decides which signed-in users can open this work. Only the creator, the Bot owner, or a group admin can change it.
| Who can see it | Description |
|---|---|
| 仅自己 (Only me) | Only the creator, the Bot owner, and group admins can open it |
| 本群 (This group) | Group members can view and edit |
| 团队 (Team) | Team members can view and present; they can edit after joining the group |
| 全员 (Everyone) | All signed-in users can view and present; only group members can edit |
- Enable sharing: creates a public link for people outside, with an optional password and version lock; see Public sharing.
Works library
「作品」 (Works) in the left sidebar collects every work you can see (it appears once you have works or have joined a group with a creation plugin enabled).
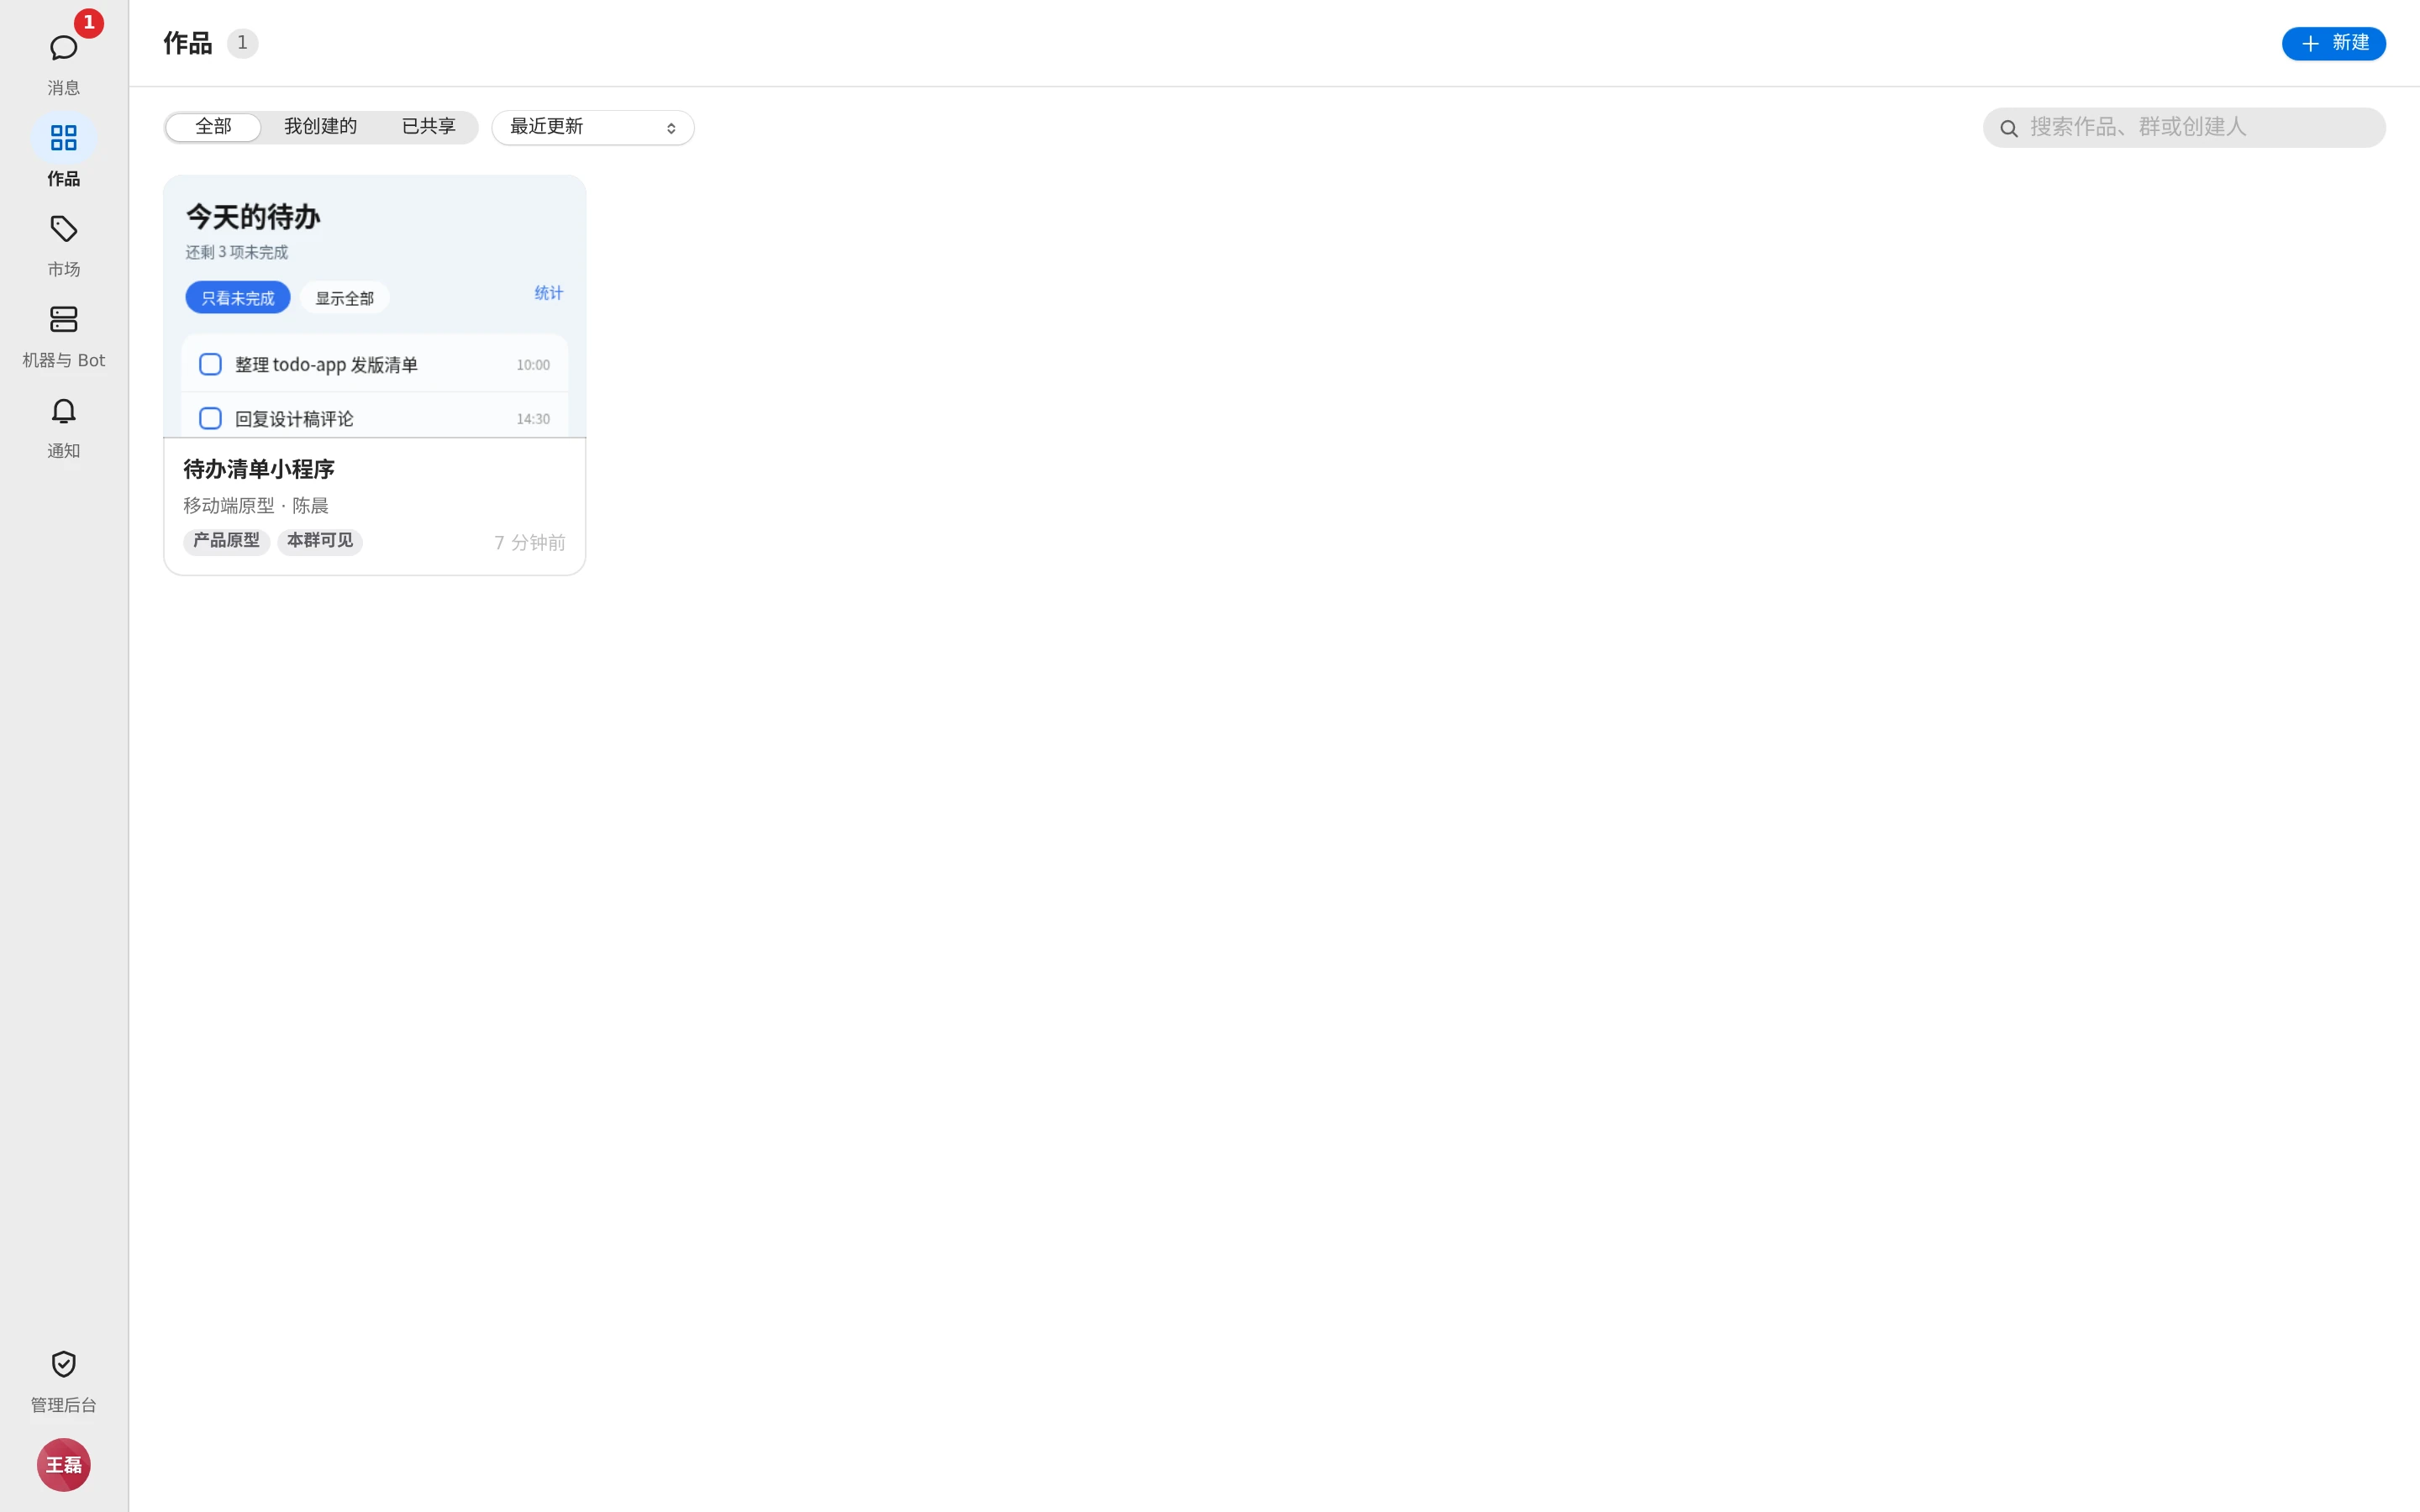
- 「范围」 (Scope): all / created by me / shared. Filter by 「来自群」 (Group), sort by 「最近更新」 (Recently updated) or 「按名称」 (By name), or search works, groups, and creators.
- Cards show who can see them (only me / this group / team / everyone).
- Click a card to open the work. If you're not in the work's group it's read-only, showing 「只读 · 进入「群名」后可修改」 (Read-only · join "group name" to change it); you can 「全屏演示」 (Present full screen) or 「在新窗口打开」 (Open in new window).
- 「新建」 (New): choose a group and start the creation there. If no group has a creation plugin enabled yet, you're prompted to ask a group admin to turn one on in 「群设置 · 插件」 (Group settings · Plugins), or to 「去市场找插件」 (Find plugins in the market).