
Agent tools and providers
This page covers how to manage the Agent tools on a machine from the web (installing and upgrading Node.js, Claude Code, and Codex), and how to configure third-party model providers for Claude Code / Codex.
Where to find it: click a machine under 「我的机器」 (My machines) in the sidebar to open 「机器详情」 (Machine details), then switch to the 「Agent 工具」 (Agent tools) or 「供应商」 (Providers) page.
Requirements
- Only the machine owner can see these two pages.
- The machine must be online. When it's offline you'll see 「机器离线,上线后才能管理 Agent 工具与供应商」 ("machine offline, Agent tools and providers can be managed once it's online"), because these settings are stored only on the machine.
- If the machine's daemon is too old, you'll see 「请先升级该机器的 daemon」 ("upgrade this machine's daemon first").
The same features are available on the desktop app's 「Agent 工具」 (Agent tools) page and via the gg agents and gg provider commands — see Desktop app pages and Command reference.
Agent tools
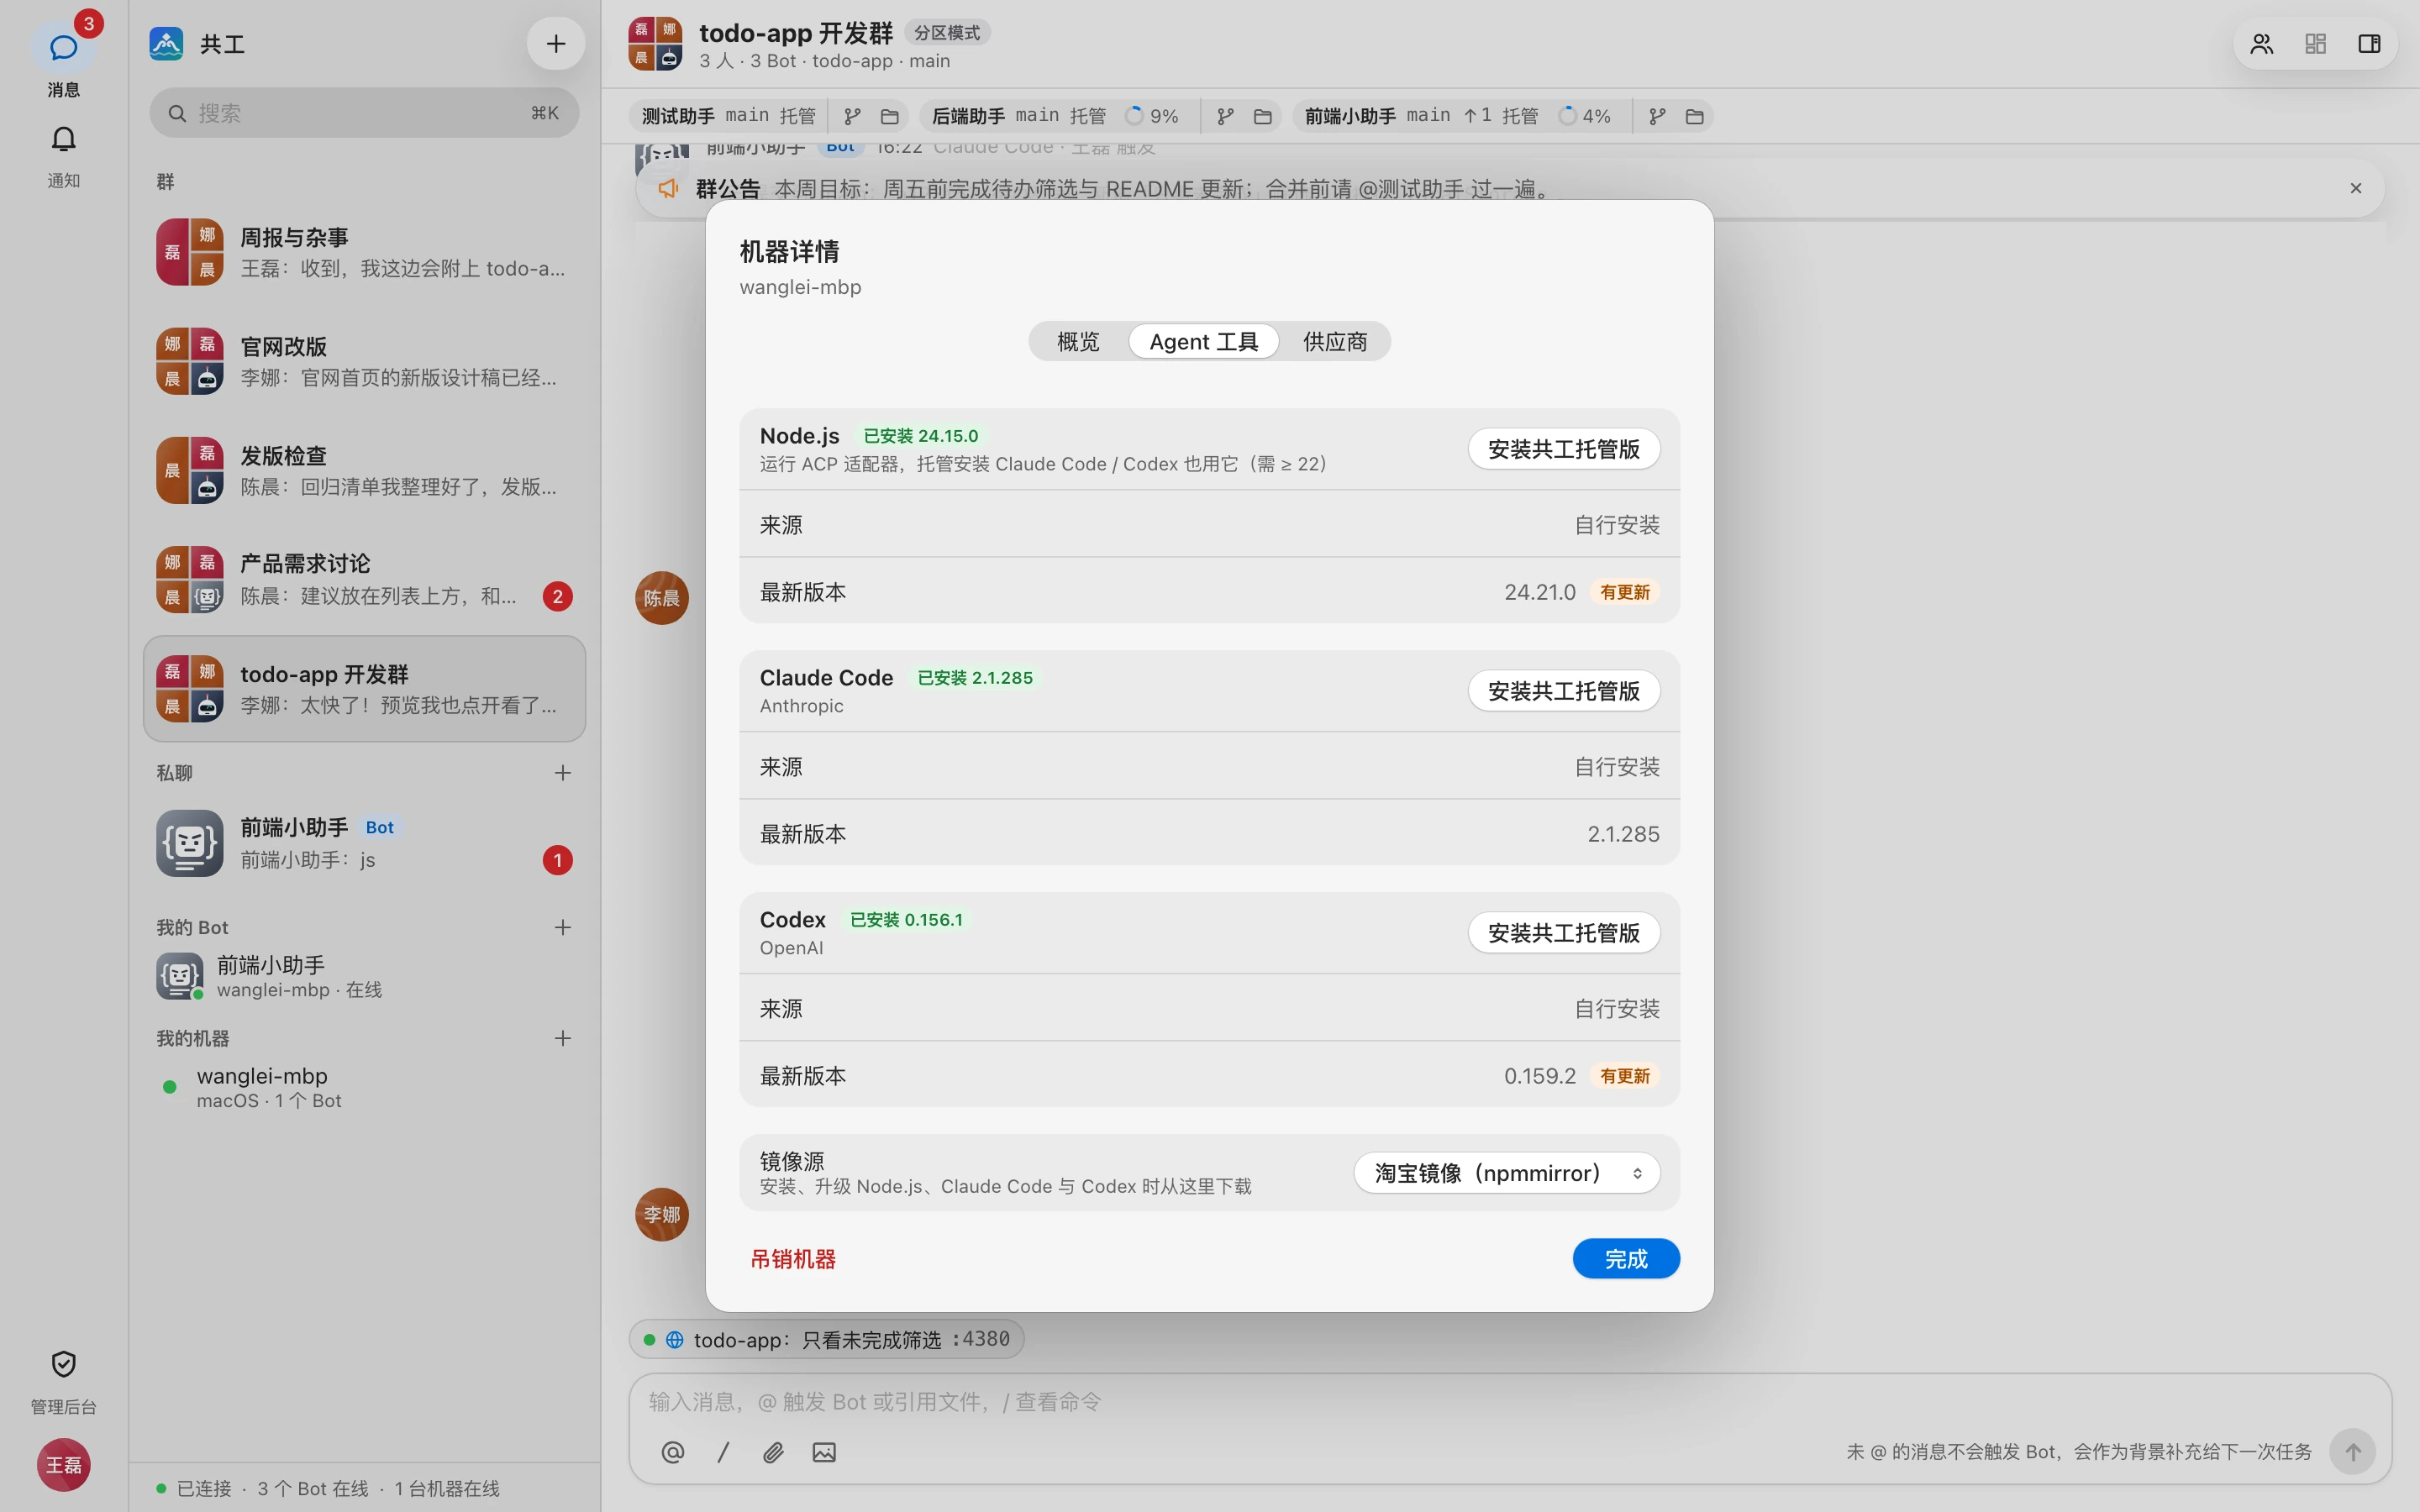
The page lists three tools:
| Tool | Description |
|---|---|
| Node.js | Runs the ACP adapters and is also used for managed installs of Claude Code / Codex; requires version 22 or later |
| Claude Code | Anthropic's command-line Agent |
| Codex | OpenAI's command-line Agent |
The tag next to each tool shows its status: 「未安装」 (Not installed), 「已安装 x.y.z」 (Installed x.y.z), or 「版本过低」 (Version too old) when Node.js is outdated. Installed tools also show:
- Source: 「共工空间托管」 (managed by Gonggong Space — installed by Gonggong Space) or 「自行安装」 (Self-installed — installed by you);
- Latest version: Marked 「有更新」 (Update available) when a newer version exists; shows 「无法获取,请检查镜像源」 ("unavailable, check the mirror") if it can't be fetched.
Install and upgrade
The button on the right changes with the status:
- 安装 (Install): Shown when the tool isn't installed, or when Node.js is too old.
- 升级到 x.y.z (Upgrade to x.y.z): Shown when a tool managed by Gonggong Space has a new version.
- 安装共工空间托管版 (Install managed version): Shown when you installed the tool yourself. Clicking it installs a separate copy managed by Gonggong Space that you can upgrade here with one click later. The self-installed copy is yours to upgrade.
After clicking, an install log expands below showing the machine's output in real time, ending with 「安装完成」 ("install complete") or 「安装失败」 ("install failed"). Only one install or upgrade can run on a machine at a time.
TIP
Gonggong Space never modifies user-level configuration on your machine such as ~/.claude/ or ~/.codex/.
Mirror
The 「镜像源」 (Mirror) setting at the bottom of the page decides where Node.js, Claude Code, and Codex are downloaded from when installing or upgrading:
| Option | Description |
|---|---|
| 淘宝镜像(npmmirror) (Taobao mirror, npmmirror) | Default; fast downloads in mainland China |
| 官方源 (Official) | The official npm registry and the Node.js website |
| 自定义 (Custom) | Fill in 「npm registry」 and 「Node.js 下载地址」 (Node.js download URL — the directory containing index.json), then click 「保存」 (Save) |
The mirror is a machine-level setting stored on that machine.
Providers
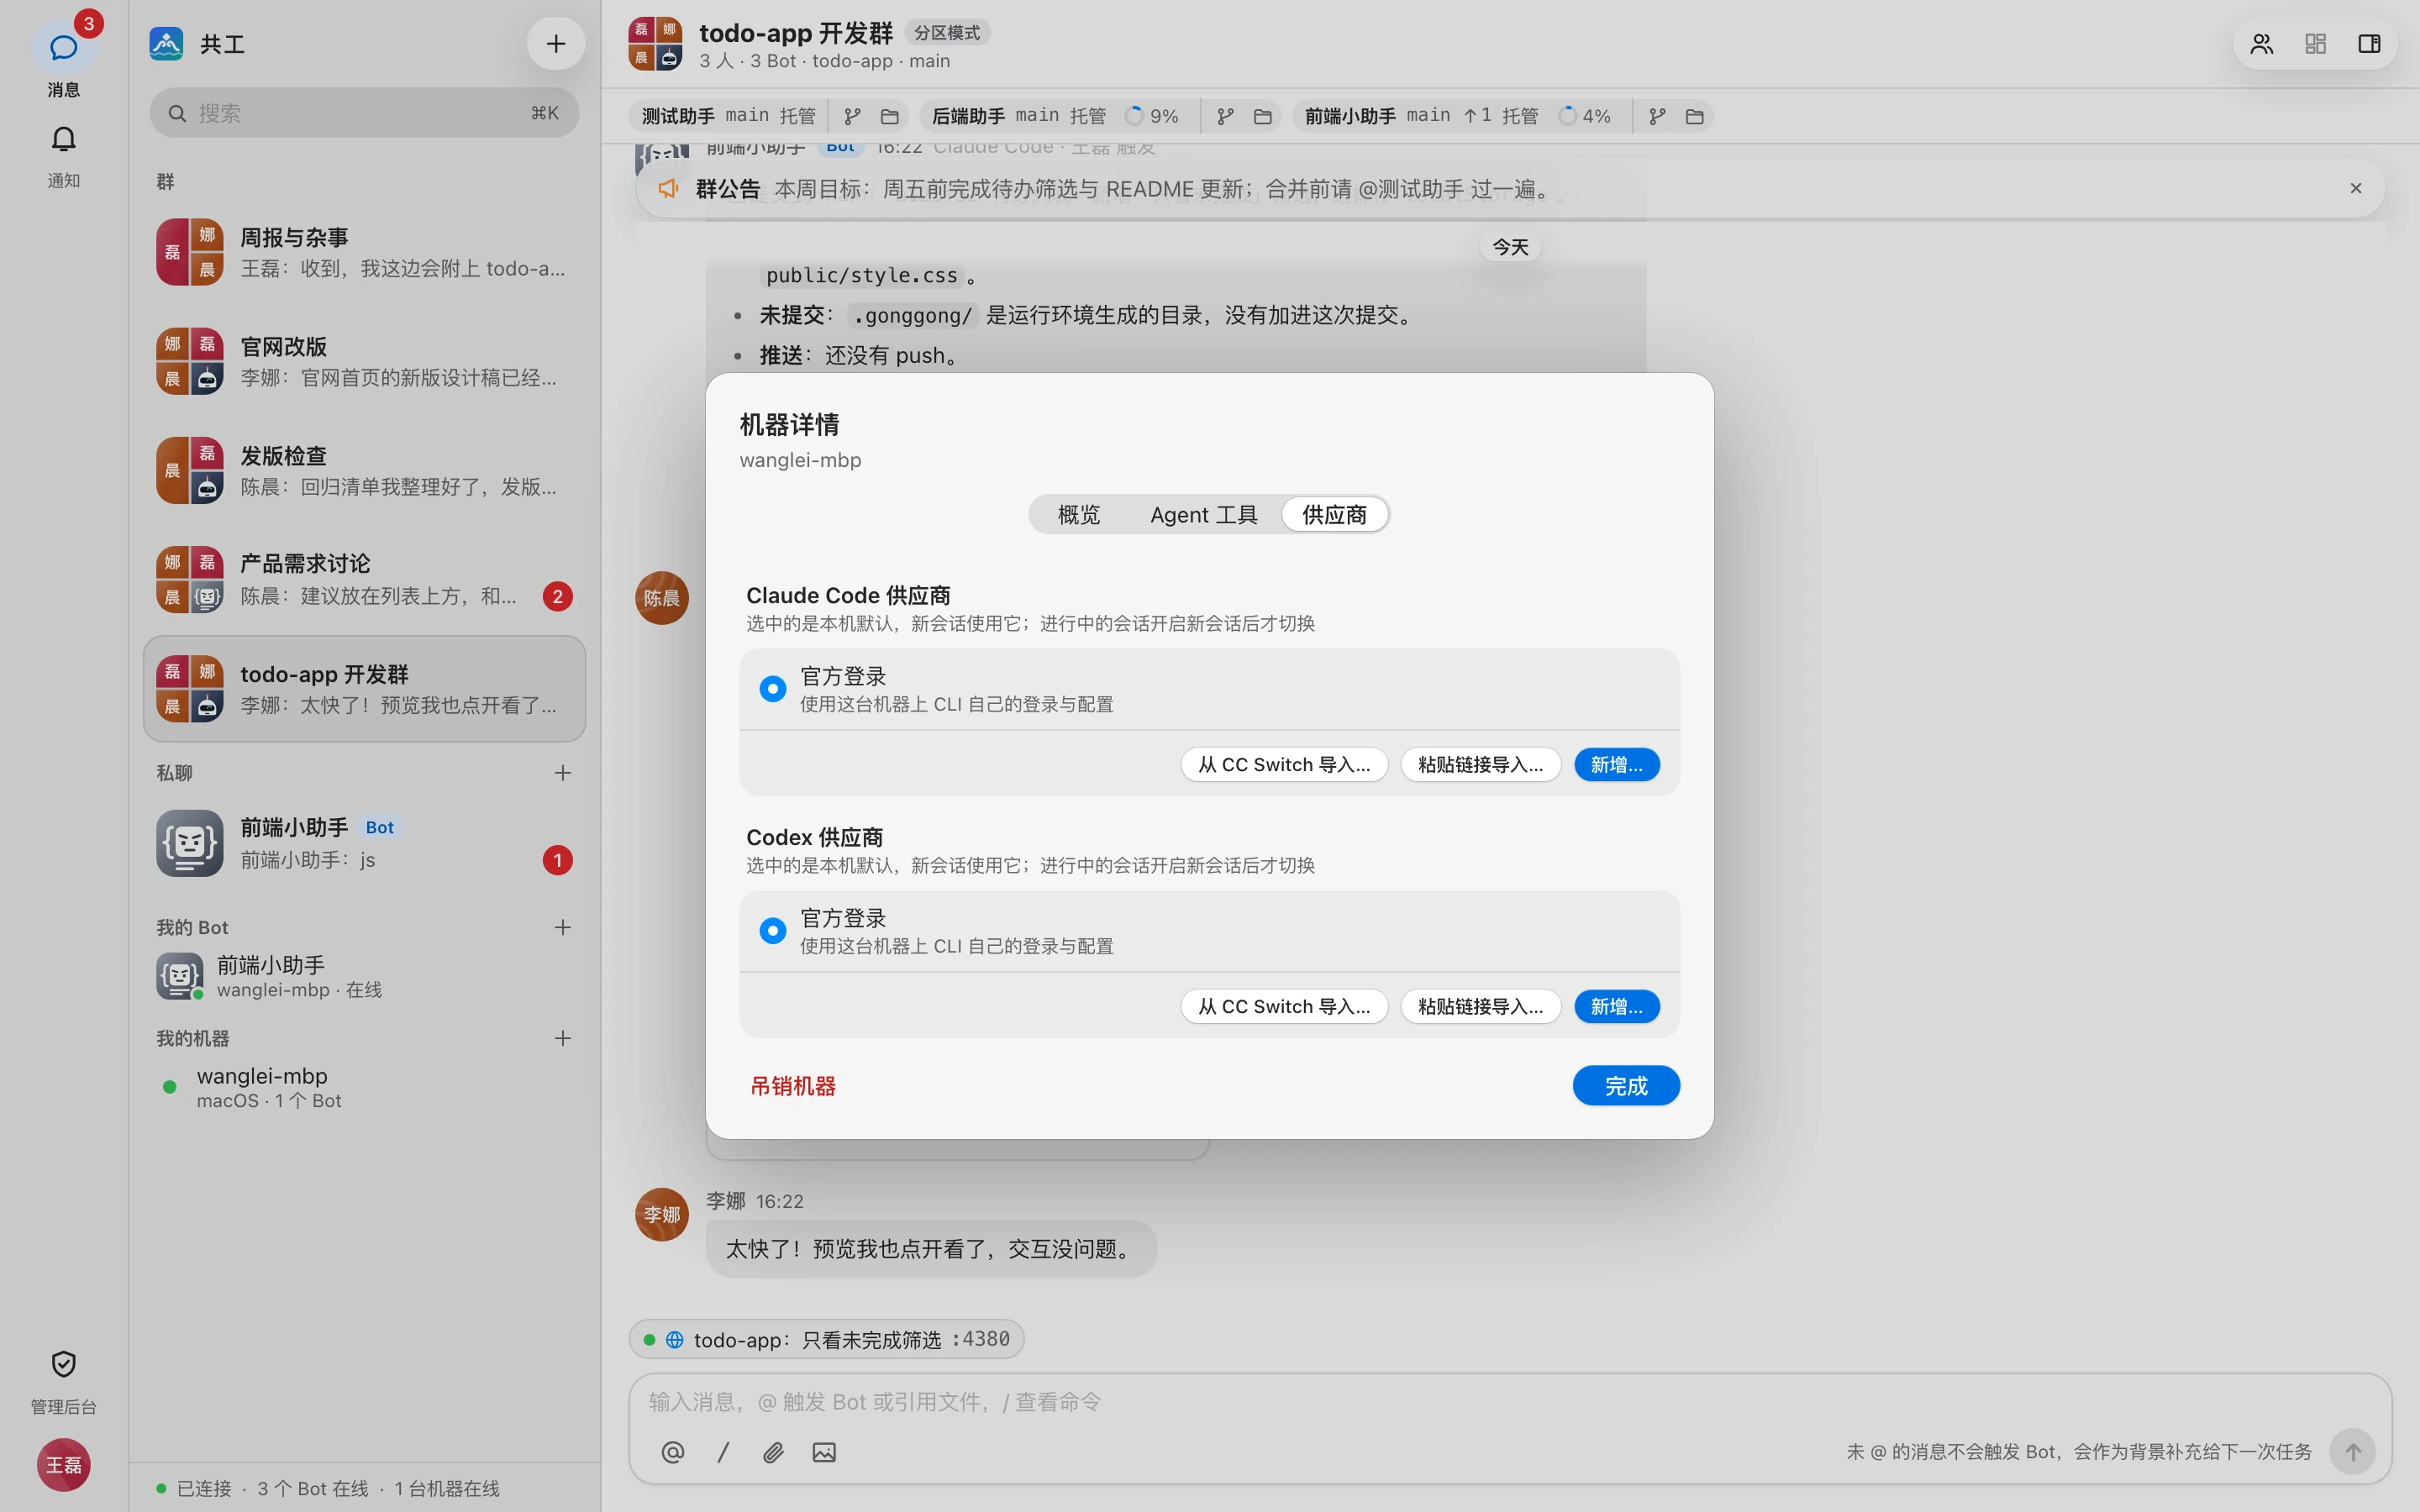
A "provider" is the service Claude Code / Codex use to call models: either the official account the CLI itself is logged into, or a third-party service (Base URL + API Key + model).
Providers are stored only on the machine
Provider names, Base URLs, API Keys, models, and bindings are stored only on this machine. They are never uploaded to the server and never appear in the server's database, logs, or audit log. The web page merely reads and writes the machine's configuration in real time through the server. Each machine has its own copy, and it can't be copied between machines.
The page has two sections: 「Claude Code 供应商」 (Claude Code providers) and 「Codex 供应商」 (Codex providers). The first entry in each is 「官方登录」 (Official login — uses the CLI's own login and configuration on this machine), followed by the providers you've added, listing Base URL, model, and masked key.
The selected entry is this machine's default provider, used by new sessions. Click its radio button to switch.
Add a provider
- Click 「新增…」 (Add…) in the relevant section.
- Pick a vendor first. Built-in presets are grouped into 「国内厂商」 (China vendors), 「聚合平台」 (Aggregators), and 「海外」 (International), and are searchable. If yours isn't listed, choose 「自定义」 (Custom) and enter the Base URL manually.
- Fill in the form:
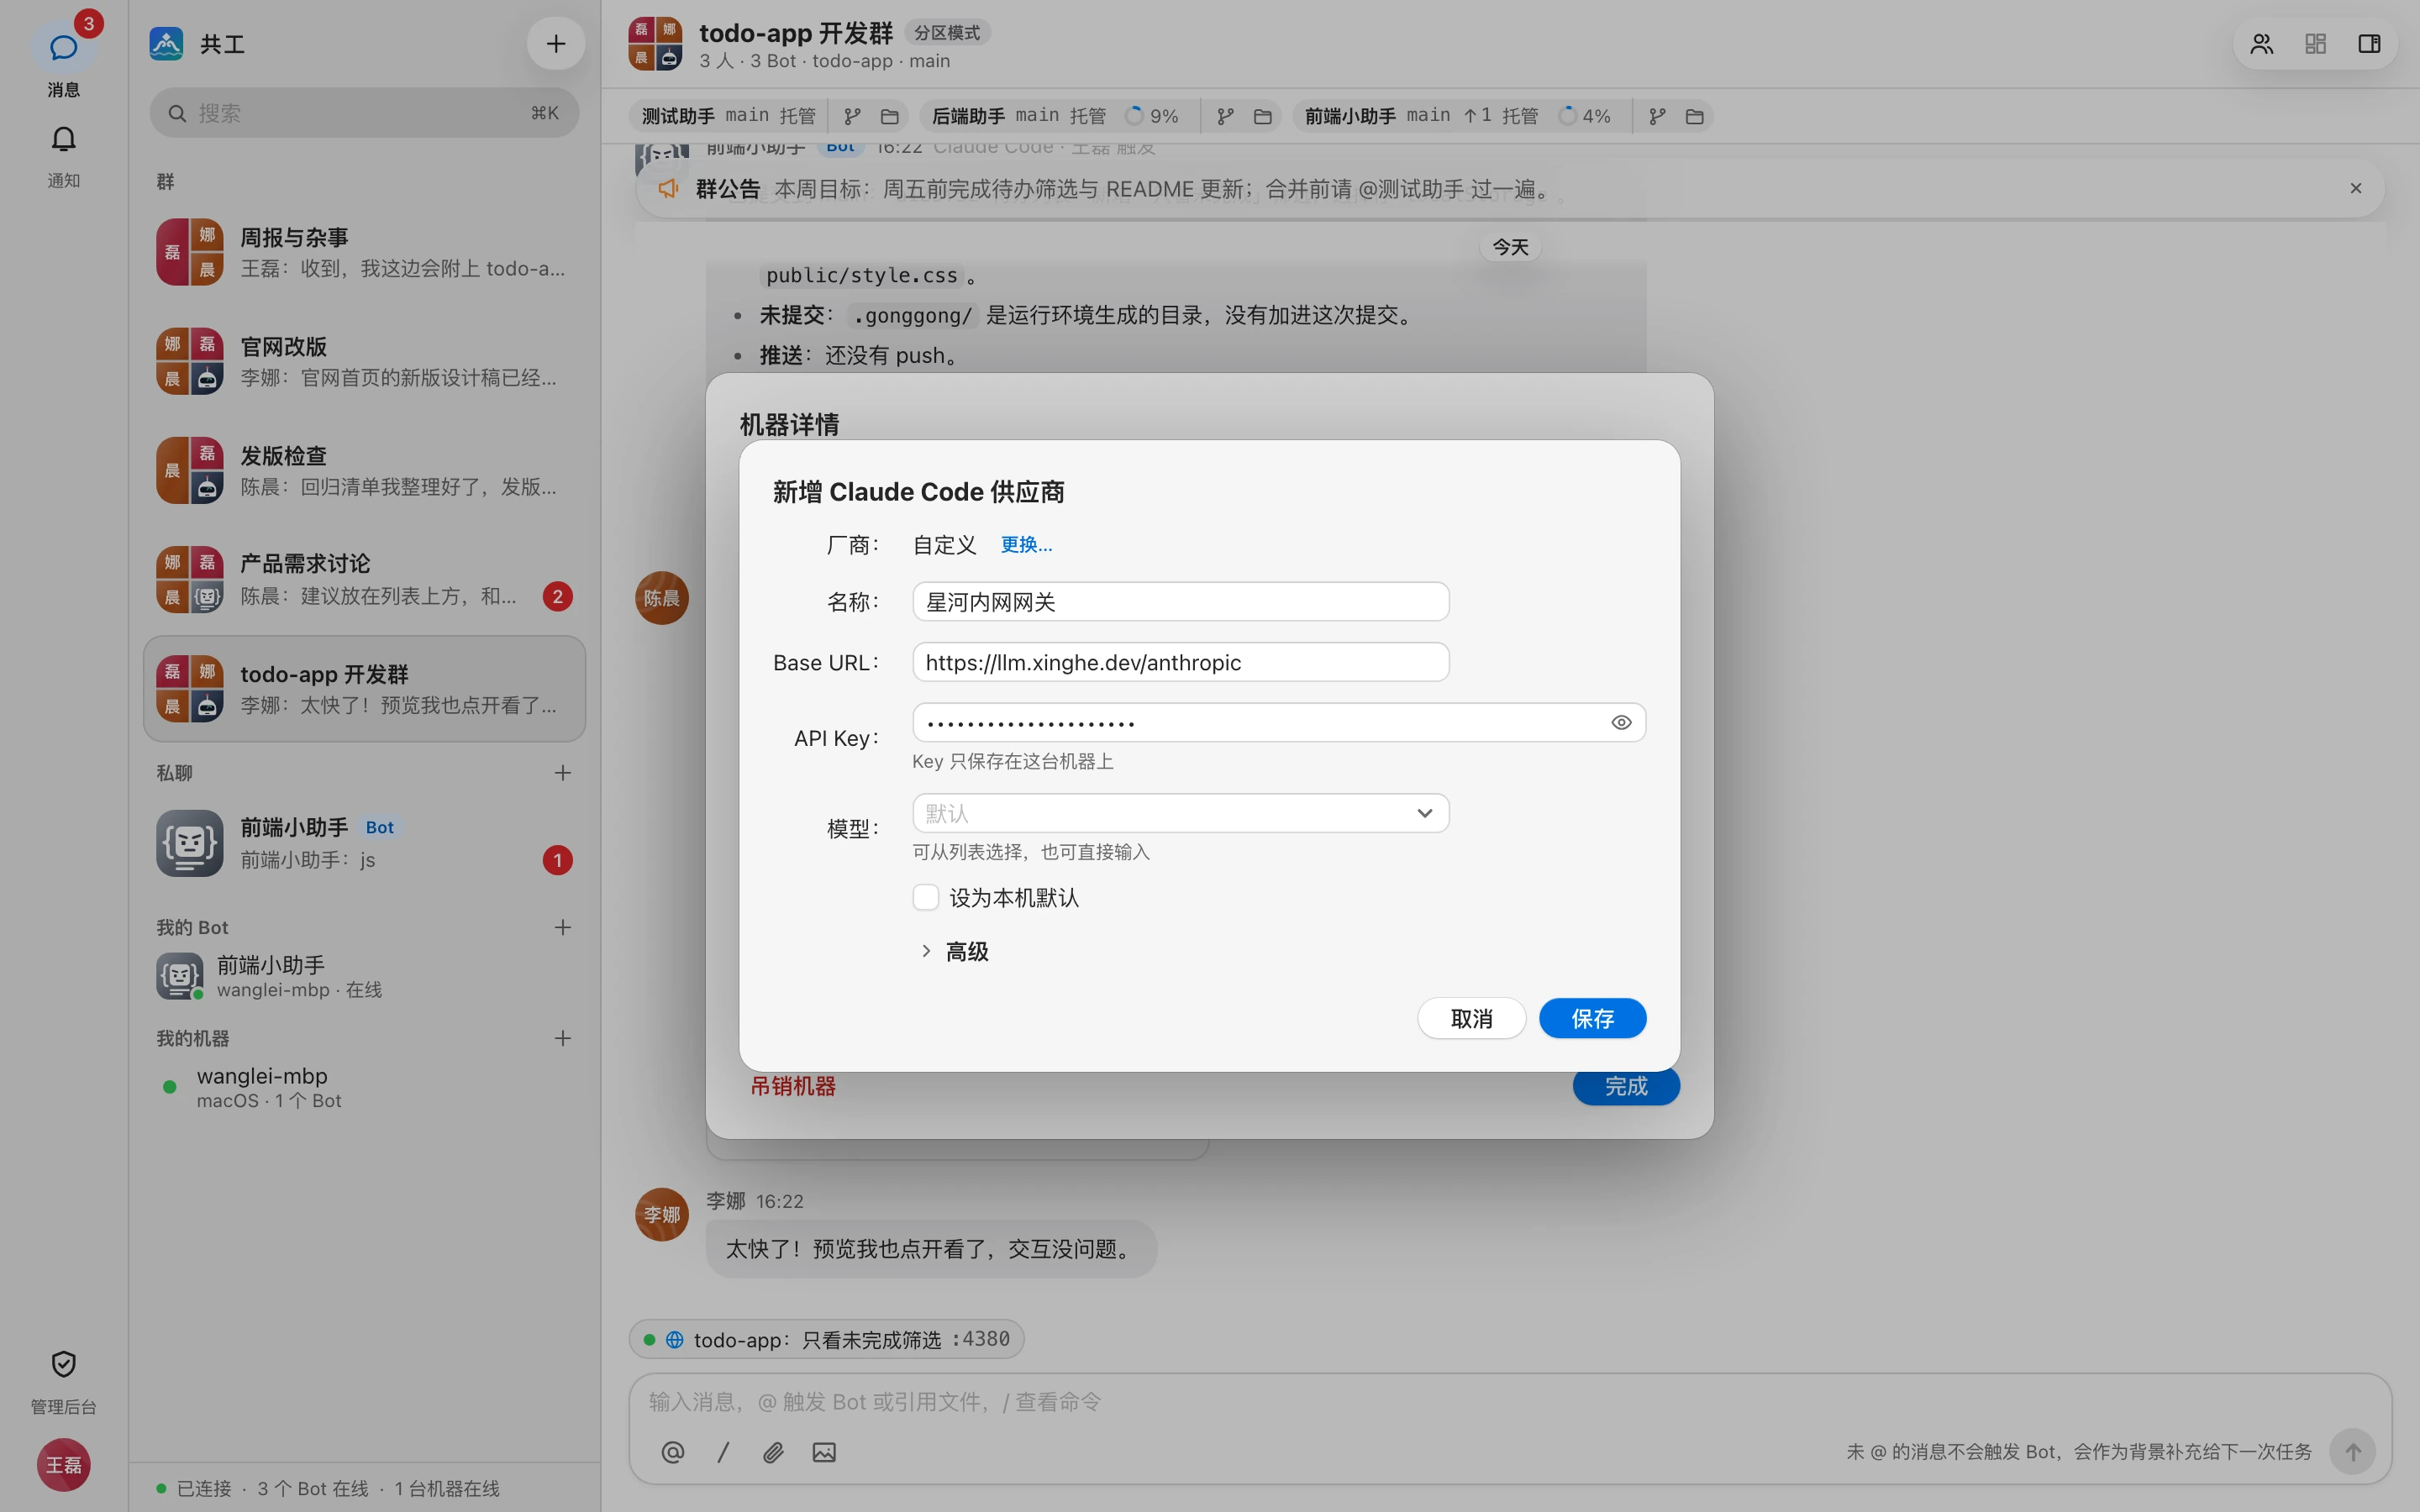
| Field | Description |
|---|---|
| 厂商 (Vendor) | The selected preset; click 「更换…」 (Change…) to pick again |
| 名称 (Name) | The name shown in the list |
| Base URL | Filled in automatically for presets (editable under 「高级」 (Advanced)); required for custom |
| API Key | Required, stored only on this machine; presets offer a 「获取 Key」 (Get key) link |
| 模型 (Model) | Pick from the list or type one in; leave empty for the default |
| 设为本机默认 (Set as machine default) | If checked, saving makes it this machine's default |
Expand 「高级」 (Advanced) for more settings (Claude Code only): mappings for 「Haiku 模型」 (Haiku model), 「Sonnet 模型」 (Sonnet model), and 「Opus 模型」 (Opus model), plus 「额外环境变量」 (Extra environment variables, one KEY=VALUE per line).
- Click 「保存」 (Save).
When editing an existing provider, leaving the API Key field empty keeps the saved key. Providers created from a preset can use 「恢复为预设值」 (Reset to preset).
Import from CC Switch
If you've managed providers on this machine with CC Switch, click 「从 CC Switch 导入…」 (Import from CC Switch…) at the bottom of the section to import them directly (if nothing is usable you'll see 「CC Switch 里没有可直接使用的 … 供应商」 — "no usable … providers in CC Switch"):
- The dialog lists the usable providers from CC Switch on this machine (keys masked), all selected by default. Existing ones are marked 「将更新已有项」 (Will update existing), and the one CC Switch is currently using is marked 「CC Switch 当前」 (CC Switch current).
- Check the ones to import. Check 「将 CC Switch 当前使用的设为本机默认」 (Set CC Switch's current provider as machine default) to switch the default at the same time.
- Click 「导入」 (Import).
Importing only reads the machine's CC Switch configuration; it doesn't modify it.
Import from a pasted link
Click 「粘贴链接导入…」 (Import from link…), paste a CC Switch provider share link (like ccswitch://v1/import?resource=provider&app=claude&…), optionally check 「设为本机默认」 (Set as machine default), and click 「导入」 (Import).
Delete a provider
Click 「删除」 (Delete) next to the provider. If it was the machine default, the default reverts to 「官方登录」 (Official login); Bots set to use it specifically switch to inheriting the machine default; sessions using it automatically start a new session on the next turn.
Which provider a Bot uses
Each Bot inherits the machine's default provider by default, or you can assign one specifically. In the Bot details, under 「供应商」 (Provider), choose:
- 「继承机器(当前:…)」 (Inherit from machine (current: …))
- 「官方登录」 (Official login)
- A provider for the same Agent on this machine
You can change it only if you're both the Bot owner and the machine owner, and the machine is online. After choosing a third-party provider, the Bot's 「模型」 (Model) list switches to that provider's models. For where to set it, see Bot settings and permissions.
Switching doesn't affect sessions in progress
Whether you switch the machine default or a Bot's provider, sessions in progress keep using the original provider; the switch takes effect once a new session is started in the group.
- If a group's session is still using the old provider when you switch, a confirmation dialog appears first, listing 「N 个群的会话仍在使用 X,开启新会话后才会切换到 Y」 ("sessions in N groups are still using X; they switch to Y after starting a new session").
- In those groups, a notice appears above the input box: 「小王的 Claude 本会话使用 X;已切换为 Y,开启新会话后生效」 ("小王's Claude uses X in this session; switched to Y, takes effect in a new session"). Click 「开启新会话」 (Start new session) to switch immediately — same as sending
/new @BotNamein the group (see Command reference).